
What Most People Think Tank Cleaning Is (And Why That’s the Problem)
Most homeowners picture rainwater tank cleaning as draining it down and hosing it out. That’s not what a professional service actually does — and the gap between those two things is where waterborne illness risk lives.
A DIY rinse removes loose sediment from the base. It doesn’t remove the biofilm layer that coats internal surfaces, the sludge that compacts at the base over time, or the bacterial load embedded in that sludge. And it certainly doesn’t give you a written report on the condition of your tank’s interior.
Step-by-Step: The Professional Tank Cleaning Process
Step 1: Pre-inspection
Before any water is removed, the technician conducts a visual pre-inspection of the tank exterior, lid, inlet screens, overflow, and pump assembly. This establishes baseline condition, identifies any safety considerations, and flags whether any findings should be discussed before the clean proceeds.
Step 2: Pump-down
The tank is pumped down to a low level — typically 10–15% of capacity, retaining just enough water to allow effective high-pressure washing. The pump-down is a controlled process; the water being removed goes to an appropriate waste or irrigation outlet, not stormwater.
Step 3: Sludge extraction
At the base of any tank that hasn’t been cleaned recently, you’ll find accumulated sludge — a mix of decayed leaf matter, sediment, bird droppings from roof catchment, and bacterial load. This is extracted using a specialist sludge vacuum that reaches the base of the tank. This step cannot be replicated with a garden hose.
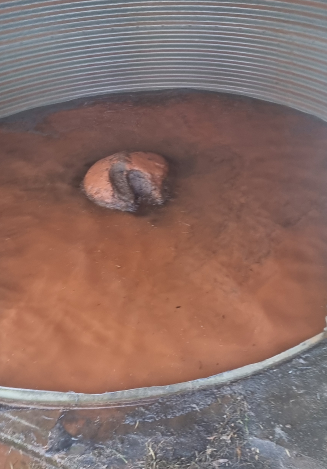
The colour and consistency of the sludge tells an experienced technician a lot: dark organic matter suggests long intervals between cleans; fine grey silt often indicates concrete degradation; reddish sludge suggests iron-rich roof runoff.
Step 4: High-pressure wash
With sludge removed and the remaining water pumped down, the interior walls, base, and lid are high-pressure washed. The equipment used is rated for confined-space operation where required. This step removes the biofilm layer — the bacterial film that clings to tank surfaces and which is invisible to the naked eye under normal lighting.
The wash is carried out systematically from lid to walls to base. Washing from base up without first cleaning walls means you’re re-contaminating the base you just cleaned.
Step 5: Biofilm treatment
Where biofilm growth is significant, a food-grade disinfectant approved for use in potable water tanks is applied to internal surfaces following the pressure wash. This is not bleach poured through the inlet — it’s a controlled application of a TGA/APVMA-registered product, used at the correct concentration, with the correct contact time before the tank is rinsed.
Step 6: Final rinse and pump-out
After treatment, the tank is rinsed thoroughly and the rinse water pumped out. The technician confirms the drain is clear at the base before refilling commences.
Step 7: Written inspection report
A professional clean should always conclude with a written report. This documents the condition of internal surfaces, any cracks or structural concerns, the sludge volume extracted, the products used, and any recommended follow-up actions.
What Sludge and Biofilm Actually Are — and Why They Matter
Sludge is the sediment layer that accumulates at the base of your tank. It contains decomposed organic matter, heavy metals from roof runoff, bird faeces, insect material, and bacteria. When your pump draws water from near the base, it pulls from the zone immediately above this layer. A disturbed sludge layer can contaminate the whole water column.
Biofilm is the thin bacterial film that coats tank surfaces. It acts as a protective layer for bacteria, shielding them from chlorine disinfection and UV treatment. A tank that looks clean on a visual inspection can still carry significant biofilm contamination. High-pressure washing with a confined-space rated unit is the only way to physically disrupt and remove it.
Cleaning Frequency Guide by Tank Use
| Tank Use | Recommended Interval |
|---|---|
| Drinking water (all household use) | Every 2–3 years |
| Toilet flushing and laundry only | Every 3–5 years |
| Garden irrigation only | Every 4–5 years, or when sediment visible |
| Fire water storage | As per AS1851 inspection schedule |
5 Warning Signs Your Tank Needs Cleaning Now
- Your tap water has a musty or earthy smell. That odour comes from biological activity in the sludge layer or biofilm.
- Water at the tap is discoloured — brown, yellow, or green tinging. This indicates a sediment disturbance or algae event.
- You haven’t had the tank cleaned in more than 5 years. Even if the water looks clear, sludge and biofilm have been building.
- Your property had a bushfire or significant smoke event nearby. Post-fire ash contamination requires a full clean and water test.
- Your pump is working harder than usual. A partial blockage from sludge build-up can affect pump performance.
Why DIY Doesn’t Cover This
A garden hose, a long-handled brush, and a willing afternoon will shift the loose surface layer of sediment. It will not extract compacted sludge from the base, remove biofilm from walls, apply controlled disinfection, or produce a written inspection report.
The risk of DIY cleaning isn’t that it does nothing — it’s that it gives you confidence that the tank is clean when the parts that matter haven’t been touched.
Frequently Asked Questions
What does a professional rainwater tank clean actually involve?
It involves a pre-inspection, pump-down to 10–15% capacity, sludge extraction using specialist vacuum equipment, high-pressure washing of all internal surfaces, biofilm treatment with a food-grade disinfectant, a final rinse and pump-out, and a written inspection report.
Why can’t I just hose out my rainwater tank myself?
A garden hose removes loose surface sediment but will not extract compacted sludge from the base, remove biofilm from walls, apply controlled disinfection at correct concentrations, or produce a written inspection report. The risk is that you feel confident the tank is clean when the parts that matter haven’t been touched.
What is biofilm and why does it matter in a rainwater tank?
Biofilm is a thin bacterial film that coats tank surfaces, invisible to the naked eye under normal conditions. It acts as a protective layer for bacteria, shielding them from chlorine disinfection and UV treatment. High-pressure washing with a confined-space rated unit is the only way to physically disrupt and remove it.
How often should I get my rainwater tank cleaned?
For a tank used for all household drinking water, every 2–3 years. For toilet flushing and laundry only, every 3–5 years. For garden irrigation only, every 4–5 years or when sediment is visible. Properties with high organic load on the roof catchment should clean at the shorter end of each range.
What are the warning signs my rainwater tank needs cleaning now?
Musty or earthy smell from tap water, discolouration (brown, yellow, or green tinging), more than 5 years since the last clean, a bushfire or significant smoke event on the property, or your pump working harder than usual due to partial sludge blockage.
Related Articles
What Happens to Water Quality After a Tank Clean? How to Get Your Water Back to Safe Drinking Standard
Your water isn't immediately safe after a tank clean. Follow this flush, disinfect and test...
Underground vs. Above-Ground Rainwater Tank: Which Is Right for Your NSW Property?
Underground or above-ground rainwater tank? Full cost, maintenance, council approval and suitability comparison for NSW...
When Should You Service Your Rainwater Tank Filtration System? Signs, Intervals, and What Gets Checked
Rainwater tank filtration systems need servicing every 6–12 months. Learn the signs it's overdue, what...
